Options Menu
The options menu contains the main actions related to the simulator workflow. Through it, the user can access file management features, code assembly, program execution controls, general configuration settings, and help resources.
This area acts as the central interaction point for starting, preparing, and controlling the execution of programs in ÆRIS.

In general, the menu can be divided into four main groups of functionality:
- file operations
- export of the assembled program
- assembly and execution controls
- general options and help
File Operations
Section titled “File Operations”File operations allow users to start a new program, open existing files, and save the current editor content.
New file
Section titled “New file”The New file option creates a new file in the editor using the simulator’s default program structure.

When this action is used, the current editor content is replaced with the simulator’s initial template:
.data
.text
This functionality is useful when the user wants to:
- start a new program using the basic structure
- quickly clear the current editor content
- restart code writing without manually recreating the main segments
Since this action replaces the current editor content, it should be used carefully if there are unsaved changes.
Open file
Section titled “Open file”The Open file option allows loading an assembly language file with the .asm extension from the user’s computer.
When a valid file is selected, its contents are loaded into the editor, allowing the user to view, edit, assemble, and execute it within the simulator.
This feature is useful for:
- continuing work on previously saved programs
- testing external examples
- loading exercises, demonstrations, or support code
- reusing files developed outside the simulator environment
The loaded file replaces the current content of the editor.
Download current file
Section titled “Download current file”The Download current file option downloads the code currently present in the editor with the .asm extension.

This feature allows saving the content being edited in the simulator locally, preserving the program for later use.
It can be used to:
- store copies of the code on the computer
- share programs with others
- create intermediate development versions
- keep backups of the work done in the editor
This feature is especially useful when the user wants to continue development later or use the same program in other environments.
Exporting the Assembled Program
Section titled “Exporting the Assembled Program”In addition to saving the assembly source code, ÆRIS also allows exporting the assembled program in different formats.
Program dump
Section titled “Program dump”The Program dump allows exporting the result of the code assembly in different formats.
This functionality is accessed through the Dump button, located in the simulator menu.

This button is only enabled after the program has been successfully assembled. If the code has not yet been assembled, or if assembly errors occur, the button remains disabled.
When the dump button is clicked, the simulator opens an export modal, where it is possible to choose the format in which the assembled program will be exported.
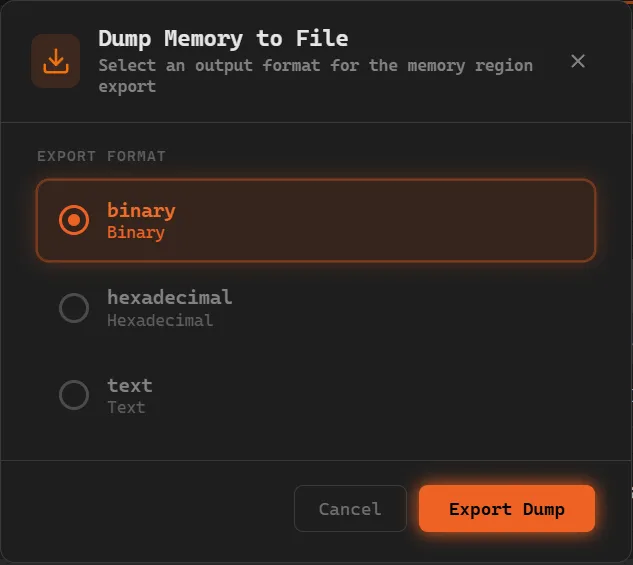
Inside this modal the following export formats are available:
-
Binary exports the program in binary format (
.bin), containing the direct representation of the instructions in machine code -
Hexadecimal exports the program in hexadecimal format (
.hex), where each instruction is represented in hexadecimal base -
Text exports a textual representation (
.txt) containing the assembled instructions and the memory used by the program
This feature is useful when users want to:
- inspect the assembly result outside the simulator
- compare different representations of the program
- use the assembled code in other environments or tools
- record the assembly output for analysis or documentation
It is important to note that the dump does not export only the text written in the editor, but rather the result produced after the assembly process. In other words, the exported content corresponds to the processed version of the program, ready for execution.
Assembly and Execution
Section titled “Assembly and Execution”Next to the file options are the controls responsible for transforming the source code into executable instructions and controlling the program simulation. These controls are used after the code has been written or loaded into the editor.
Assemble
Section titled “Assemble”The Assemble option analyzes the code written in the editor and converts it into machine code.

During this process, the simulator interprets the structure of the program, processes instructions, directives, and other supported elements, and prepares the content for execution.
Assembly is a mandatory step before executing the program. While the code has not been assembled correctly, the execution controls remain unavailable.
This step is important because it:
- validates the content written in the editor
- prepares the program for simulation
- generates the assembled representation that will be displayed in the execution panel
- allows identifying problems before execution
Run continuously
Section titled “Run continuously”The Run continuously option starts the automatic execution of the program.

In this mode, the simulator advances through the instructions sequentially without requiring user interaction at each step.
Execution continues until the program finishes or until an ecall instruction that requires input data is executed. In these cases, execution pauses so the user can provide the requested value in the console.
This type of execution is useful when users want to:
- quickly observe the general behavior of the program
- test the final execution result
- verify the output produced in the console
- run simple programs without inspecting each instruction individually
Step execution
Section titled “Step execution”The Step execution option executes one instruction at a time.

This mode is especially important for detailed analysis of the program behavior, since it allows observing precisely the effect of each instruction on the processor state.
The Step execution button is only available while there are still instructions to execute. Once execution reaches the last instruction of the program, the button becomes disabled.
Step execution is useful to:
- study the program execution flow
- understand how each instruction modifies registers and memory
- debug unexpected behaviors
- observe jumps, arithmetic operations, memory access, and system calls in a controlled way
Undo last step
Section titled “Undo last step”The Undo last step option returns the execution to the previous state.

This feature allows reverting the last executed instruction, making it possible to review state transitions without restarting the entire simulation.
The Undo last step button is only enabled after at least one instruction has been executed. If no instruction has been executed yet, the option remains disabled.
It is useful for:
- reviewing changes caused by a specific instruction
- comparing the state before and after a step
- quickly going back during step-by-step analysis
- correcting accidental execution advances
This functionality significantly improves the exploration and debugging experience of the program.
Reset execution
Section titled “Reset execution”The Reset execution option resets the simulator state, allowing the program to be executed again from the beginning.

When resetting, the simulator returns execution to its initial state after assembly, discarding the progress made during the current simulation.
This feature is useful when users want to:
- completely restart program testing
- repeat an execution from the beginning
- compare different execution strategies
- reevaluate the program behavior after changes
Reset is especially useful after several testing steps or step-by-step exploration.
Options Modal
Section titled “Options Modal”In addition to file and execution resources, the menu also provides access to general simulator settings.
The Options button opens the simulator configuration modal.

When this button is clicked, a modal window is displayed where it is possible to adjust settings related to the behavior and appearance of the interface.
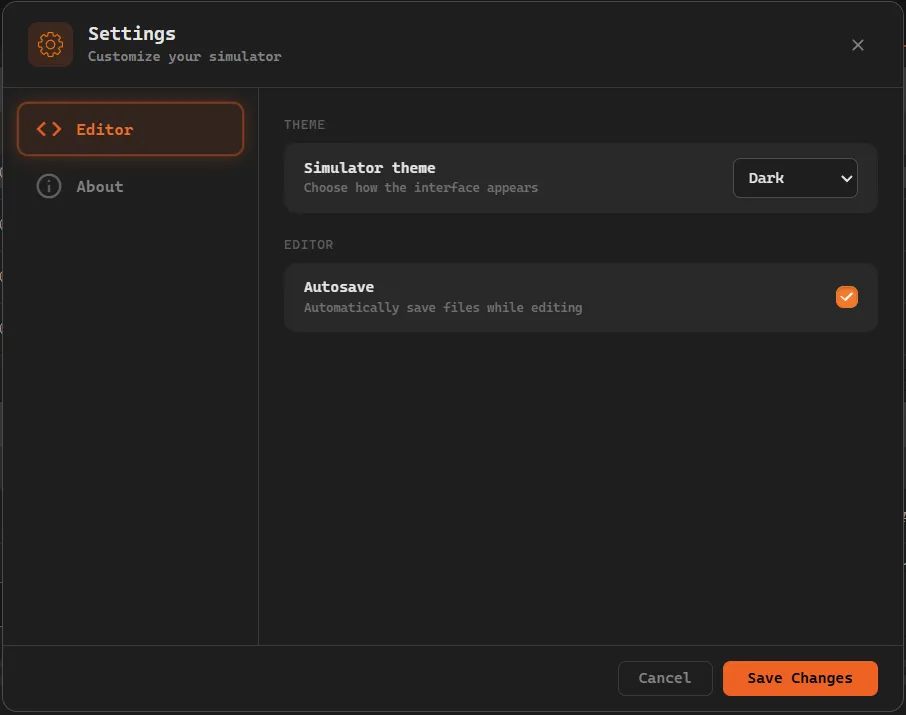
Inside this modal there are several simulator settings available.
Among them are:
-
Interface theme
Allows selecting the visual theme of the simulator.
Currently, only the dark theme is available. -
Editor autosave
Allows enabling or disabling automatic saving of the editor content.
When enabled, the code written in the editor is automatically preserved and can be restored if the page is reloaded.
At the bottom of the modal there are two control buttons:
- Cancel closes the modal and discards the changes made
- Save applies the selected settings
About tab
Section titled “About tab”The modal also contains a tab called About, which displays information about the project.
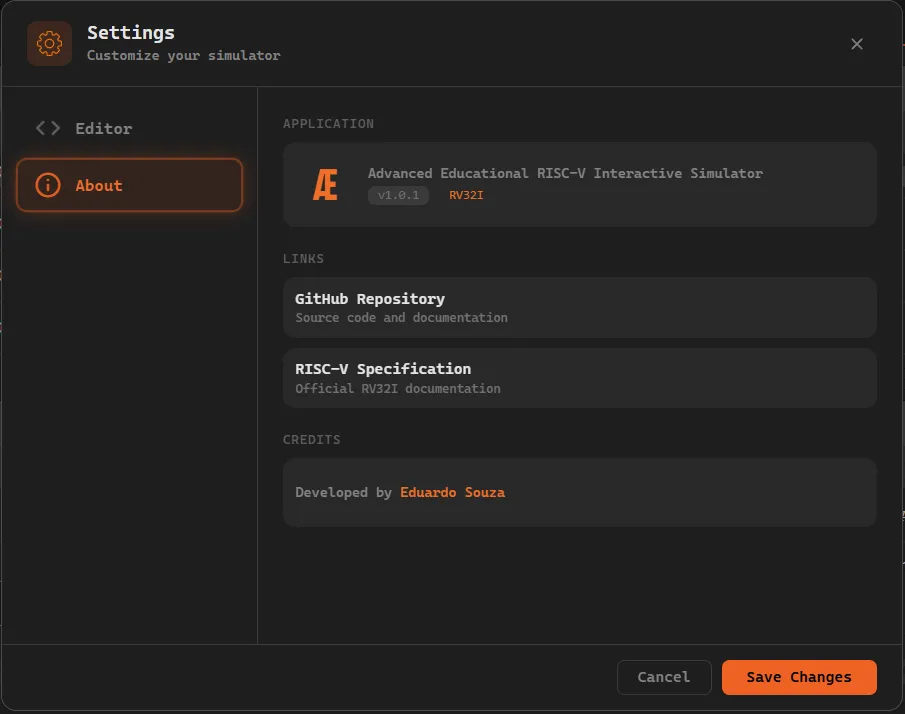
This tab shows institutional and reference information, including:
- the current version of ÆRIS
- the project repository link
- the link to the official RISC-V specification
This section allows users to quickly check information about the simulator and access external resources related to the project.
Help Modal
Section titled “Help Modal”The Help button opens the simulator help modal.

When this button is clicked, a modal is displayed containing a quick reference of the main elements supported by the simulator.
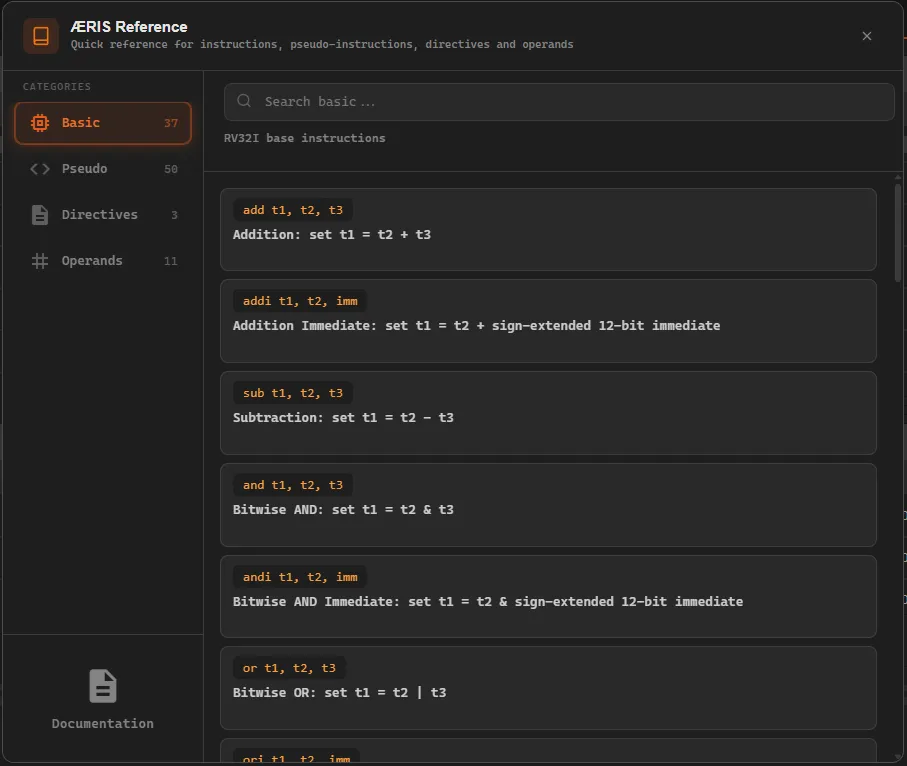
This modal organizes the information into different tabs, allowing easy navigation between the types of elements accepted by the simulator.
The available tabs are:
- Basic Instructions lists the basic instructions supported by the simulator
- Pseudo Instructions presents the available pseudo-instructions
- Directives shows the directives accepted by the assembler
- Operands displays the operands used in instructions
Each tab contains a search bar located at the top of the modal.
This search allows quickly filtering the displayed elements, making it easier to find a specific instruction, directive, or operand.
These details help users quickly understand what each element does and how it can be used while writing programs in the editor.
At the bottom of the modal there is also a direct link to this documentation, allowing access to more detailed explanations about the simulator and its features.